Showing posts with label How To. Show all posts

7 Reasons to Clean Your Windows PC Registry

The registry is the most important component of your Windows PC and it's sensitive as well. But what is it all about? The Windows Registry is simply a database arranged in hierarchy and the settings for everything on your Windows PC is stored on it. It can be hardware, software, and user profiles configuration information. Another work of the registry is to control and manage the working of all programs installed on your computer.

You can say that Windows system cannot work without the help of the registry. Whenever you boot the system, all the registry is read into memory. It means the role of the registry starts from the boot-up of the machine. When it's corrupted or malfunctions, your system won't work properly or won't even boot.

Having said that, it is paramount to regularly clean your Windows PC registry to keep it free from unwanted entries which clusters around it. If you are a little bit techy or conversant with it, you can do this without installing any third-party software or app but if you aren't sure of what you are doing, you can use apps that let you achieve it seamlessly.

Registry cleaners are apps/software that provide you with an easy, efficient and reliable method to scan and clean the Windows registry. They ensure high performance of your system as your PC remains error free. Some of the best Windows registry cleaners are CleanMyPC, RegClean Pro, CCleaner, Registry Booster. Apart from cleaning your PC, cleaning your house is important as well, thanks to cleaning service Chicago.

7 REASONS TO CLEAN YOUR PC WINDOWS REGISTRY

1. Uninstallation of Apps

Do you know that whenever an application is installed on your PC, it creates several entries to the registry? Once that is done, the said application works properly. However, when you uninstall that same application, some of these entries remains in the registry's database thereby creating problems of increased database size which makes your computer to slow down, sluggish and slow to respond to certain commands.

2. Old Entries

Similarly, all the tasks you perform on your computer generates and record entries in the database which increases overtime so you have to regularly run a scan and clean them up to keep your PC fresh and in optimal performance.

3. Program Re-installation

Any time an application is re-installed, some keys are added without deleting the keys that were added to the first-time installation of that application. This again increases the size of the registry.

4. Vacant Spaces

Now, this is somehow strange. It's now obvious that whenever an entry is deleted, it leaves a vacant space. These unwanted spaces keep on building from time to time until it leads to registry fragmentation and makes it unstable. This causes the system slowdown and increases the data access time.

5. Malicious Entries

Viruses and Malware are enemies to PC owners and the reason is not farfetched. In this situation, when a virus, Trojans, spyware, malware, and adware attack your system, they automatically insert invalid entries in the registry. These entries generate system errors. Thus, they damage the registry and causes the system to breakdown.

6. Registry Keys That Are Almost Impossible To Remove

Most paid software comes with a license keys with agreement which wants you to enter the license Key to save license information on your system. Many spyware and malware programs also add irremovable entries to the registry. Thus, the number of keys keep increasing to cause the registry to an unstable system.

7. System Shutdown

Whenever your system boots, it moves the registry to system memory to ensure faster data access. But this must be noted that any changes done in the registry during the operational time, are updated to the system registry during the shutdown process. These registry entries get corrupted if there is a power failure or system crash take place or improper shutdown is done.

Therefore, a good registry cleaner is always a better option if you are not much familiar with the registry. It scans and cleans the registry and fragments it to make it compact also. It results in faster application response time and overall smoother PC performance. With time and due to various installations and un-installations in your system, many invalid registry entries are created.

Even accessing, moving or deleting files from your system create invalid registry entries. These entries may produce problems in your system and bulk your registry over time. A good registry cleaner scans your system for any registry errors, and if found then fix them. It also fragments the registry to keep it streamlined.

How to Remove Annoying Ads on Your TECNO, Infinix and Gionee Phones

Are you getting annoying ads on your Tecno, Infinix and Gionee smartphone ? If yes, would like to stop ? If your answer to this question is yes then you’re in the right spot. Some ads can be pretty annoying especially if they don’t interest you or are intruding. The only way to stop the ads is to look for the cause of the ads and stop it. We will be showing you how to do that here.

HOW TO REMOVE ANNOYING ADS ON YOUR TECNO, INFINIX AND GIONEE PHONES

The number one reason why most tecno and Infinix users are receiving ads is the launcher they are using. Tecno comes HiOS launcher while Infinix comes with XOS launcher. These two launchers show you ads in form of recommending apps for you to download. You can see the ad when you pull up the app launcher. On Tecno Phones (HiOS launcher) and Infinix Phones (XOS launcher), you can turn this off by following the steps below.

1. Press and hold on an empty space on your phone’s home screen till some options come up at the bottom side of the screen.

3. In the bottom side, Click on desktop settings for Tecno Phones and Menu for Infinix Phones and Select Other Settings.

3. From here you can turn off application recommendation.

This will stop apps recommendation from showing up on your tecno and Infinix phone. You can also solve this by installing a new launcher from the Google play store to replace your existing app launcher.

HOW TO BLOCK POP UP ADS ON YOUR TECNO, INFINIX AND GIONEE PHONES

If you’re being plagued by pop up ads on your android device then there are so many approach to fix the problem. First, you can try to figure out which app is popping up the ad on your screen. If the ads only pops up when you launch a specific app then that app is definitely the cause of the pop up ad which might be a way for the developers of the app to monetise the app. You can either uninstall the app to stop the pop up ads or continue using the app like that with the pop up ads. You can also download an add blocker like “Ad Block Plus” or any other ad blocker from the Google Play store to do the job for you.

Now, if the pop up ad randomly pop ups on your android without launching an app then we might be looking at a virus. You can try using an antivirus app to scan your device. A better solution will be to factory reset your device which will wipe everything off including the virus. Remember to back up your important files before performing a factory reset on your device. Once you do that, the pop up ads should stop. Going forward, you should be careful of the apps you install and where you get the apps from.

HOW TO BLOCK PUSH ADS/NOTIFICATIONS ON YOUR ANDROID DEVICE

Push ads are the ads/notification that just show up on your notification panel. Stopping this kind of add is actually very easy. All you have to do is wait till you get any of those ads, swipe down your notification panel and click on it. Any app that opens is the app responsible for this. You’ll then have to navigate to that app settings from within the app and turn it off. Different apps have different methods of turning this off. If you can’t find the option to turn this off in the settings menu of the app you can drop the name of the app below in the comment section and we’ll guide you on how to go about it.

CONCLUSION

If you’re experiencing any other type of annoying ads on your android device not talked about here, be sure to let us know in the comment section down below so as to provide a solution to stop the ads.

12 Ways To Solve Network Problems in Mobile Phones

Sometimes you experience network connectivity problems such as "mobile network not available" and "mobile network error" when using your mobile phones. There are signal boosters available in the market like the one made by holgadirect. But some people are yet to know what they can do to solve this network issues that's why this article is coming up this time around
The funny but interesting thing about this network issues is sometimes it happens even when the signal strength from the service provider is excellent. This you can observe by checking on other handsets using the same network you are using. So what is really the cause of this problems? Well, like every other phone issues, there is always a solution but when it comes to this one, the solution is usually very simple in most cases. So I will be showing you the best 12 ways to solve network problems on your phone without on your own without visiting a service center. In other words, you can call it a Do-It-Yourself (DIY) guide.

HOW TO SOLVE SMARTPHONE NETWORK PROBLEMS

1. Enable And Disable Airplane Mode

This is actually the first step you should take once your network hangs, freezes, slows down, dissappears or refuses to come up. In fact, there is no day i don't do this on my phone especially whenever I notice the slow in speed or weak signal so I suggest you also make it a culture of always turning ON and OFF the flight mode on your mobile phone. It helps renew network search and boost connections.
Doing it is simple because most smartphones have the airplane mode in the notification area, just slide down, tap the ✈️ symbol and after few seconds, tap it again to turn it off, then turn on the phone's mobile network.

2. Change Network Mode

3G and 4G services are still not available in some cities, communities and villages and where it is available, it might not be strong enough so if your phone network mode is set to any of them, you might loose signal. In this situation, you should set the network mode to only 2G or Edge.

Here is how to do it below
✔️ Go to Settings and open Wireless and Network settings.
✔️ Then tap on Mobile Networks.
✔️ Tap Network Mode.
✔️ Select GSM only (2G Only) or WCDMA/GSM (3G/2G Auto) by removing WCDMA only (3G Only) mode.

Meanwhile, you can also select "auto mode" WCDMA/GSM, the phone will automatically attract the best available signals.

3. Activate the Data Roaming Option

This particular option is useful whenever you are traveling because of network fluctuation from different masts. You need to Turn ON data roaming if you’re unable to connect with Internet due to weak mobile signals or network not available error, turn on the data roaming option.

Here is how to do it:
✔️ Go to Settings and open Wireless and Network settings.
✔️ Tap on Mobile Networks.
✔️ Now, tap the Data Roaming option.


4. Fix Improper Radio Signals Broadcasting

Sometimes you face this error because your Android phone broadcasts improper radio signals. To fix the issue just follow the below mentioned instructions.

✔️ Dial *#*#4636#*#* from your Android phone.

✔ There will appear a “Testing Menu”. Select “Phone Information” from the category.

✔ Now an option “Run Ping Test” will appear on the screen. Tap this option.

✔ Scroll down the page where you will see a drop down menu. Tap this menu to show its options. Now click “GSM Auto (PRL).

✔ Below will be the option “Turn Radio Off”. Select it and reboot your phone to work it effectively. Now you will get rid of the problem for sure.

However, there is a rare case where the radio signal 📶 issue is severe. In that case, this method won't fix it because the signal is totally lost because of corrupted memory file in the ROM. This happened to one of my phones (Infinix Hot Note) back then. The only way i fixed it was flashing the stock ROM.

SEE ALSO... How To Browse Faster With MTN Network

5. Reinsert Phone SIM Card

Reinserting the SIM card can do wonders beyond your imagination. Have you ever asked yourself why Blackberry customer service representatives normally ask you to reinsert the battery and SIM card after subscribing for a BIS? That's the simple trick to refresh the network and connect you to the best nearest one around you. Same is applicable to Android, iOS and other mobile phones.

So, do the following:
✔️ Switch off your smartphone.
✔️ Remove the battery (if it's removable but if not, leave it)
✔️ Remove SIM card.
✔️ Wait for 2 minutes.
✔️ Reinsert the SIM card and battery.
✔️ Wait for 5 Minutes.
✔️ Switch on the smartphone.


6. Select Preferred Networks Automatically

Letting the phone select preferred network automatically can also solve network problems in most cases. So, you set “Manually Select Preferred Network”, then change it to “Automatically Select Preferred Network” in your mobile phone settings.

See how to do it:

✔ ️Go to Wireless and Network Settings.
✔️ Tap on Mobile Networks.
✔️ Select Network Operators.
✔️ Select it to Automatically. That's it.


7. Handle Lightly or Remove the Cover

Are you aware that holding your mobile phone with tight hands adds another layer that restricts networks from reaching to the phone? Yes that's a fact and it could be one of the reasons you are having poor network signals. Avoid always covering the upper side of your phone with your hands 👐.

Also, removing the smartphone cover can also help you boost the signal strength. If you’re facing the poor signals in your phone, you should firstly remove the phone cover. The signal strength should improve.

8. Open Your Windows & Find Nearest Towers

Although this is not necessary where there is excellent network but places with very poor signal should always try opening windows and doors or better still, come out in the open place whenever they want to make calls or brows (this reminds me of the funny scenarios some years back when we have to climb on top of uncompleted buildings and sometimes, trees in search 🔎 of network. Funny!

As we all know that the closer you’re to the the mobile network tower, the stronger your signal will be. But, mobile phones don’t always connect to the nearest tower.

If you can find out your nearest mobile tower and the one your phone is connected to, you can point your phone in the direction of the tower you’re connected to.

You can use the mobile apps like OpenSignal for plotting a map of of your nearby towers. The apps like OpenSignal will be proven helpful to find out the nearest tower and the one your phone is connected to.

9. Make Phone Calls Using Wi-Fi Signals

If even after trying all the above methods it’s still very hard to get signals in your phone phone, you should try making phone calls using WiFi.

If you’ve WiFi router connected to the broadband connection at your home, you can turn on this feature from your WiFi router to make phone calls and send messages over WiFi networks without needing to worry of mobile signals.

10. Install a Mobile Phone Signal Booster

Mobile phone signal boosters finds out the outdoor signals, amplify them, and broadcast to a space that is receiving weak or no signal.

So, if your home or office is out of coverage area, you should install a signal booster. These third party gadgets are also known as repeaters. There are lots of them available in google playstore.

11. Try Factory Reset Your Mobile Phone

So if after trying the above methods and non worked for you, then try factory resetting your phone📱 because it's second to the last bus stop for handset repairs.

For Android smartphones, follow the steps below:

✔️ First, take backup of your data.
✔️ Go to Settings & tap Backup and Reset option.
✔️ Now tap on Factory Data Reset and then finally tap Reset Device.
Note that this procedure might be slightly different in some Android phones with different OS versions.

12. Install a Stock or Custom ROM
Finally, this is the last option if every other ones failed but note that it's very very rare to take you to this extent except the radio signal of the phone is corrupted and lost (just like my Infinix Hot Note). Also note that your phone must be rooted in order to flash a ROM

SEE ALSO... Ways To Cope With Poor Network Service

I believe you learnt something new from this article, anyway, if you still need more guidance, drop your comments and I will attend to you. Please also hit the Share buttons below to share on Facebook, Twitter etc.

How To Save Money For a Trip

Traveling is fun, educative and adventurous but you don't have to be wealthy to travel to your favorite locations; all you need is adequate planning and an economic lifestyle.

People travel for different reasons ranging from business trips, studying abroad, skill acquisition, holiday vacations, excursion, sports, events, honeymoon etc. While the elites in the society sees traveling as fun, the average person sees it as a herculean task because of the money involved in securing Visa, Flight tickets, accommodation and other miscellaneous expenses attached to traveling (especially abroad).

In other words, whether you are rich, average or poor, you can still travel to your favorite country if you follow the tips on how to save money for travel on this article, also use the best luggage brands.
How to save money for a trip

HOW TO SAVE MONEY FOR TRAVEL
I have listed some common strategies to help you save money for your next of first trip below.

1. Start a Side Job
A side job could be an online business which you can be doing simultaneously with your normal daily offline jobs. For instance, a classroom teacher can go into freelancing job which he or she can always do after school hours without interfering with the school activities.

If the teacher is not an online savvy person, he can always start conducting extra moral lessons after normal school hours and make some more money for the trip.

Now let me tell you, a teacher can actually make more than the required money to travel to Europe or any other flight routes under one week through freelancing.

Yes it's true but requires extra work and dedication to achieve that because hardwork + smart work results to more money and success in todays world.

2. Open a New Savings Bank Account
Yes you may need to open a new savings bank account solely for your business trips. This will be the account you save all the money you make from your side jobs.

You will be surprised how much you have saved in 6 months if you are consistent and serious about it.

3. Minimize Your Spending Habits
If you are the type that likes buying any new gadget in town, I'm sorry, you need to cut in on that and watch your spendings if you are actually concerned on saving money for a trip.

Mr. A could be spending lavishly on flashy stuffs and still have enough money for his travels but for Mr. B, he has to understand that all fingers are not equal so to save for your trip, you need to minimize your spending habit.
How to save money for a trip

4. Party Less
Partying or clubbing is fun and a good way to end the week but when you have travel budgets in your mind, you may need to party less or at least spend less while partying.

5. Use Your Car to Make Money
If you have a car, it could surprisingly be an additional source of income to you when you storm the roads to engage in commercial transporting business.

I have a friend that always goes to the roads by 5pm after daily activities to carry passengers and he makes a decent amount of money from that. You too can consider that and save the money made from it for your trip.

6. Cut On Housing Budget
To save the money for your trip, you may need to manage living in a cheap and less affordable house for the mean time. It's hard to take but when there is need for such, a man can always do that to save some bucks.

7. Sell Your Stuffs
Depending on your status and the purpose of traveling, you may sell off some of your properties to fund for your trip.

Assuming you are a single guy trying to travel abroad to work but needs money. Don't you think it's wise to sell that your second hand car to raise money? Who knows, you will replace that money within few weeks or months working abroad.

While selling your property is not the ultimate first step to save money, it can come in handy when other options has proved abortive.

8. Book Cheap Flights
Don't get it twisted, some cheap flights are very conformable and convenient so don't allow the word "cheap" scare you away.

According to your budget, you can book cheap flights from Travelstart Nigeria to save costs for your trip to your desired destination in the world.

CONCLUSION
I love traveling and I'm sure many people also do. The aim of this post is to show everyone that there are creative ways to save money for your trip without borrowing or getting the money from dubious ways.

www.travelstart.com.ng/ happens to be one of the best flight booking website in Nigeria right now. A good option for everyone no matter your gender and level. 

How To Revive A Phone That Fell Inside Water


We are in raining season and this is the time that many people's phone accidentally gets wet either by dropping inside water or any other means. It is very frustrating and can paint the whole day black for the phone owner because virtually every phone that drops inside water automatically refuses to switch ON or work normally again and trying to force it to come up can tremendously increase the damage on the phone.

So here is the simple and basic steps you will take immediately your phone is soaked with water.


SECTION ONE (normal procedure)


STEP 1:  Remove the phone from the water as quickly as possible

STEP 2:  Clean it thoroughly with dry cotton cloth

STEP 3:  Remove the battery, sim card, memory card immediately

STEP 4:  Place the phone under the sun for 24 or 48 hours 

NOTE: Don't try switching it ON before this time!

STEP 5:  After the stipulated time, take it and insert the battery first; switch it ON. It should come up


SECTION TWO (funny but interesting method mostly for non removable battery phones)


STEP 1: Take the phone out of the water immediately

STEP 2: Wipe the surface of the phone with a paper towel


STEP 3: If its an iphone, do not remove the battery, because doing that would void the warranty, after wiping the surface of the phone just place the phone in a bag of uncooked rice for 24 hours, it will absorb the water, bring it out afterwards and you can now switch on 
If its not an iphone, ensure to remove the battery and any other detachable part of the phone before putting it in a bag of uncooked rice.

However, if all the above mentioned process didn't work for you, kindly take your phone to specialists to dry it.

Meanwhile, it's always advisable to always put on your rain jacket in Winter as it will also help protect your mobile phones and other important gadgets.
Good luck.


Never miss any future post from WizyTechs anymore, CLICK HERE TO SUBSCRIBE NOW to get instant updates next time on my new wonderful post. Once you 
enter your email, you will have to check your inbox for a confirmation message containing a confirmation link. Once verified, you will never miss any future updates or articles. Like us on facebook and Follow us on Twitter

Hope this info helps? Then share this post with your friends using the Facebook Share/Like/tweet icons below. You can share your thoughts by using the comment box

How To Disable Autocorrect On Android

Autocorrect on an Android phone is a comfortable and modern feature, but at times, it can be frustrating and annoying instead of being helpful.
Depending on the way you write, the prediction of your words can be off point and that can simply prolong an easy task.
Fortunately, Autocorrect is not a must. You can just deactivate it.

What Are The Benefits Of Disabling Autocorrect?

There are advantages to turning Autocorrect off. It could be that you are always typing several names or that your preferred, latest vernacular is one that Android’s built-in dictionary knows nothing about yet. All this and more can render Autocorrect useless.
Disabling Autocorrect is also useful if you are comfortable with 2 languages and repeatedly switch between languages as you type.
keyboard autocorrect

How Can I Disable Autocorrect On Android?

Autocorrect settings are specific to every keyboard software or application you use, which includes the default Gboard. Even if the autocorrect options are deep in a keyboard’s settings, every keyboard can be used from the same sub-menu.
For the sake of this tutorial, we will use Gboard, but you should be aware of where you need to diverge if the keyboard you intend to turn off is different.
Also note that when autocorrect is disabled, the default Android keyboard (Gboard) will continue to provide correction suggestions at the top of the keyboard, but it will not swap in a predicted correction when a space is added after a word. Rather, the word will be left anyhow it is typed by you.
  1.  Launch the Settings application.
  2.  Click System > Languages & input > Virtual keyboard.
  3. You will notice a list of every installed keyboard, which includes default installations. Click Gboard, or any keyboard you intend to disable autocorrect for.
  4. Click Text correction.
  5. Swipe down to the Corrections section and click Auto-correction to ensure it is toggled off.
  6. You are done.
That's how to disable autocorrect on android.

How To Ensure Your PCB Project Doesn’t Go Over Budget


When you start a PCB design project and there are many designers working on it, it is really important that you set a budget that everyone needs to stick to. Sticking to the budget is often as easy as making sure that your design library is updated and maintained.

Here, we are going to give you some tips on how you can ensure your PCB project doesn’t go over budget. Keep reading if you’d like to find out more about this.
pcb project

Make Sure You Have A Single Library

Our first tip is to make sure that your PCB libraries are centralized in one single library. When you do this, you can be sure that the information is shared with your team and that they know what has been approved already. When you are setting up a single library, we suggest that you use standard life-cycle schemes and define a clear organisational structure.

Use a Starter Library

When you first start making your own components, you will find that it is very time consuming and this can lead to issues with going over the budget. For this reason, we suggest that you use a starter library of components that will allow you to use approved parts without too much hassle. This way, you’ll save some time and money along the way.

Use Online Integration

One of the most important ways that you can make sure that your project doesn’t go over budget is by making use of online integration and having up to date information on parts. You’ll need to be in regular contact with suppliers to ensure that your parts are within budget and that you can access them when you need to. Try to stay connected and this will help you to avoid going over budget.

Utilize Footprint Creation

Our final tip for those who want to make sure that they stay within their project budget is to utilize footprint creation tools on the PCB design software. You’ll find that it can take a long time to create an accurate library of footprints that include all of the important details that you’ll need. For this reason, we suggest using a wizard that can do this for you and you won’t need to waste time or money finding the information from third-parties.

Final Verdict

There are many ways that you can save some cash on your PCB design project including making sure that you have a component library that can do its job correctly. Make sure that you have one centralized library that all of your designers and your librarian can access in order to reduce time spent on the project and stick within your budget.

Make sure to take on board all of the tips that we have given you in this article and you should be able to stick within your budget and still get your PCB design project completed on time.

How To Recover Lost Files On a MicroSD Card

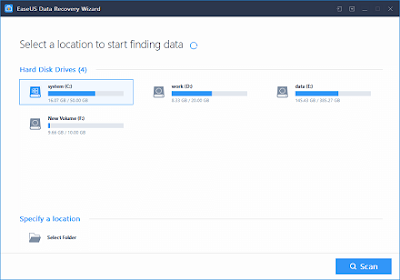
Through this post, you will learn how to recover lost, deleted or missing files on a microSD card with few clicks. From time to time, we see ourselves in a situation where our SD card (Memory card) got damaged, attacked by virus or gets corrupted thereby wiping out some or all the files inside the memory card. So with an app called EaseUS Data Recovery software, you will be able to recover all lost files no matter the way and manner it was lost.

EaseUS is a free Data Recovery Software that lets you recover lost, deleted and missing files from your computer with ease. It is one of the best data recovery programs for PC users because of its outstanding features.

HOW TO RECOVER LOST FILES USING EASEUS DATA RECOVERY SOFTWARE
Here Is How To Recover Lost Files From Your MicroSD Card Using EaseUS Data Recovery app;
  • Connect your microSD card to your PC using a very good card reader
  • Then, run the EaseUS Data recovery software
  • Open the location where your SDcard is situated on your computer (usually :D folder)
  • Now right-click and scan the memory card for missing files
  • Finally, preview and recover lost files.


Apart from using this powerful tool to recover lost files from an SDcard, it can be used to recover the following stuffs;
✔️ Hard drive damage
✔️ Accidentally deleted files
✔️ Recycle bin empty data recovery
✔️ Lost partition recovery
✔️ OS crash recovery
✔️ Raw partition recovery
✔️ Virus attack file recovery
And so on.

As you can see, the importance of this data recovery tool can not be overemphasized that's why it's trusted by so many users globally. With easeus software, the lost of a file on your storage device no longer means end of the world.

2 Ways To Repair a Damaged MicroSD Card

MicroSD card also called memory card is an external storage device used on some electronic gadgets like smartphones and digital cameras to store data. This memory is very important because it helps relieve the parent device from the burden of being overwhelmed with data, it can be used to store apps, music, videos, pictures and documents which could have taken the whole of phone internal memory space so it also helps in making phones faster.
Repair damaged microSD card
MicroSD Cards are available in different sizes but the most common sizes are 512MB, 2GB, 8GB, 16GB, 32GB and 64GB memory cards. From my personal experience, the higher the size or capacity of an SD card, the more volatile it becomes.

Having said that, memory cards can disappoint you when it gets damaged and it gets worst if you don't have a backup in place. But in this post, I will show you 2 ways which I use to recover lost data and repair a damaged microSD card.

HOW TO RECOVER FILES & REPAIR A MICROSD CARD
✔️ First of all, you will have to download a computer program called "Recuva", which is basically to try to recover all the information on that card. Also, remember that it is not always possible to recover all the information, sometimes you can not even recover a portion.
✔️ Then connect the SD card to the computer using a card reader, if you have a laptop, usually bring by default (some) card reader.
✔️ Right mouse click on the SD card drive to choose properties, tools, and check.
✔️ If there is a blockage on the card, you must run the tab that protects against writing and removes it to re-insert it into the PC. Now if it appears as if the storage device is empty what you are going to have to do is go to Folder Options, View and in this part enable hidden folders and units, which is almost at the end, then simply click on to accept.
Recuva sd card data

SOLUTION: FIX DAMAGED MICROSD CARD

Another solution is to use a computer to fix the damaged memory card.

✔️ Go to start and then write CMD.
On the screen type “SFC / SCANNOW” without the quotes and with the microSD connected to the computer, enter it.
✔️ The system will start scanning the card and will try to repair all the files in it.

NOTE: I advice you to always make a cloud backup of your most important files and data. You can do this by saving them to your gmail account. This will enable you have access to the files even if the SDcard is totally damaged beyond recovery or you lost it. Another advantage of cloud backup is that you can have access to the files on the go or anywhere in the world.

SIMILAR ARTICLES
✔️ Another Method To Fix Damaged Sd card
✔️ How To Identify A Fake MicroSD Card
✔️ How To Install Apps on SD Card Instead Of Phone Internal Memory.

Have a nice time.

How To Use WhatsApp Group Video Calls Feature

Whatsapp recently introduced new features which includes group video calls but most users on whatsapp don't have idea of how it works so in this post, you will learn how to use whatsapp group video calls features.

The Group call feature is now fully available both on whatsapp for Android and iOS devices. It can be used for presentations, by more than two people, it allows families, friends and work colleagues communicate on a live video similar to the traditional group calling feature. You see, conversation is more fun now and realistic.
Whatsapp group video calls

PROCEDURES

✔️ First, you’ll have to make sure your WhatsApp is up-to-date. If it isn’t then head to your respective stores(Google Play Store For Android and Apple App Store for iOS etc.) and update the app before following the below steps.

✔️ Launch the WhatsApp application and head to your contacts list. Pick and Click on the person you would like to call and hit the Video Icon/Video call button at the top right side of the screen to Video Call, the person.
As soon as the person picks the video call, you’ll see a Plus Contact sign at the top right corner of the WhatsApp screen. Click on it to add another contact to the video call. This will take you to your contact list. Select any contact of your choice to add them to the ongoing video call.

✔️ Now when you Select the contact you would like to add to the video call, he/she gets shown that there are already two people in the video call. If he/she accepts then, they get added to the to the video call.

✔️ To add another person to the Video call, Follow the above steps and add another contact.

That is how you make a group video call on WhatsApp. Currently, only a maximum of 4 people can be added to the group video call. Once the number of participants in the group video call gets to 4, the option to add a new contact at the top right corner disappears.

I hope you enjoy it.

Infinix Note 4 Pro Android 8.1 Oreo OTA Update Now Available

After rolling out Android 8.0 Oreo update on Infinix Note 4, Infinix Mobile has just started rolling out latest Android 8.1 Oreo OTA update to its Note 4 Pro device.

This official update comes with improved battery features and enhanced performance. Also added to this Android 8.1 Oreo update is Android File Go file manager app to save your files. Other features include Eye Care Mode, picture-to-picture mode, and Duo function for video calls.
Infinix hot 4 pro Android 8.1 update

IMPORTANT THINGS TO DO BEFORE EMBARKING ON THE UPDATE

✔️ Ensure your infinix Note 4 pro is not rooted else it may be bricked
✔️ Charge your smartphone battery to at least 95% before you start the updating process.
✔️ Ensure you make a Backup of your current firmware in case anything goes wrong or you wish to downgrade your device if the update contains bugs
✔️ Make sure you have enough data before you click on "download". It's recommended you have at least 2GB Data on your SIM
✔️ Ensure there is strong 3G network in your phone to avoid interruptions while the update is going on.

HOW TO CHECK INFINIX NOTE 4 PRO OREO UPDATE

This guide is for all users of Note 4 Pro that are yet to receive notification for the update on their device. You can check for the update manually by navigating into your phone settings > About Phone > Check for latest update.

Once it's available, simply tap on “Download And Install” to download the Android 8.1 update on your Note 4 Pro phone.

Now, wait for the new update to fully install on your phone. Don't interrupt the process! After successful installation, your phone will be rebooted Android 8.1 Oreo. Welcome to the Android Oreo OS.

That's how to know if Android Oreo update is available on your Infinix phone and how to upgrade infinix note 4 pro to Android 8.1.

Let's know if you have gotten the update already on your device via the comments section of this blog.

New Way To Download Torrent Files With IDM

One of the commonly searched words on google is "how to download torrent files" and fortunately, a solution was found with the use of Troffic.com but currently, Troffic site is Down so we are not able to download Torrent files with IDM. But don't worry, I have another solution for it through this new way to download Torrent Files With IDM.
New way to download torrent files with idm

This new trick will allow you download Torrent files with IDM without much hassles. Just Follow these below steps and and you will be glad you did.

STEPS TO DOWNLOAD TORRENT FILES WITH IDM

STEP 1
Download the Torrent file which you want to download from any torrent site (Ex. kat.ph, extratorrent)

STEP 2
Save this Torrent File on your System, for easy save it on Desktop.

STEP 3
Now, go to ZbigZ.com

STEP 4
Click on "upload" and Upload the torrent file.

STEP 5
Hit Go button Wait for caching the Torrent File.

STEP 6
Now click on Download button, it will ask for ”choose your account” Choose Free account Wait, Downloading will start in a Second.
How to download torrent files

SEE ALSO How To Download Torrent Files On iOS Devices

That's the new way to download Torrent files with IDM. Enjoy.

How to Avoid GDPR Geo-Blocking


Businesses all around the world have been scrambling recently to get compliant with the new European GDPR legislation, and there are still many companies yet to become fully compliant. They are fast running out of time before the European authorities begin catching up with them. For some companies and websites, everything is up in the air at the moment, and there has been a lot of chaos when it comes to people being geo-blocked from certain websites that are non-compliant with the new European regulations.
How to Avoid GDPR Geo-Blocking

Many companies are still unsure whether the GDPR applies to them, and there is a lot of confusion surrounding whether or not the GDPR is actually relevant to non-EU citizens. While definitive answers are yet to come from official sources and geo-blocks are yet to be lifted, there are plenty of things you can do to get around these restrictions and access the content that has been barred by some U.S. sites.

#1: What is the GDPR?

If you haven’t yet heard about the GDPR, you’re pretty lucky! It is something that has plagued the inbox of hundreds of millions of people worldwide and, quite frankly, many of us are tired of hearing about it.
The GDPR (General Data Protection Regulation) is a piece of European legislation with a worldwide impact. It is a new law for protection of data and privacy for all individuals residing within the EU. It does not matter whether or not your website is based in the EU – if you have traffic coming from and you are handling data on individuals from the EU, you must comply with the GDPR or face the threat of hefty fines being brought by the European authorities.

#2: Why Are U.S. Sites Geo-Blocking?

Simply to protect themselves. Many US-based sites are unaware as to whether the GDPR applies to them, and in a bid to avoid serious proceedings being brought by the European authorities, U.S. sites have started blocking traffic from EU countries.
When the GDPR came into force on May 25th, lots of major U.S. news sites blocked access for EU visitors trying to avoid any culpability should the GDPR apply to them. It’s better to be safe than sorry, and it’s not hard to understand the reasoning behind the decisions to geo-block EU traffic by certain major U.S. sites and news outlets.
It was simply a case of “allow EU visitors to continue accessing the site and risk being hit with harsh fines from the European authorities” versus “geo-block EU traffic until there has been some clarification as to compliance and whether the GDPR applies to them.” In many cases, U.S. sites are geo-blocking EU visitors until such a time that they have managed to catch up with the GDPR and become compliant. However, others are holding out for an official line from European authorities.

#3: Accessing Geo-Blocked Websites

Geo-blocking is nothing new; it is a method that has been used by several countries (i.e., China, Russia and North Korea) to block content that governments do not want their citizens accessing. Sites such as YouTube and Facebook, for example, are geo-blocked in a few of these countries in order to prevent citizens from accessing content that potentially undermines their governments or regimes.
The classic way to access geo-blocked content is to use a VPN – Virtual Private Network – a clever piece of software that connects you to a virtual location and changes your IP address. When you enable a VPN, your IP changes to that of the server you are connected to, and these servers are located worldwide, from the U.S. to Canada to Australia and beyond.
The VPN changes your IP and makes your web traffic look like it is coming from the country to which you are connected. If a website cannot identify your traffic as coming from a geo-blocked location, it will let you unblock all of its content.
In the wake of the GDPR, many U.S. websites have blocked traffic from EU visitors until such a time as either i) the site becomes GDPR-compliant, or ii) the European authorities officially clarify to whom GDPR applies beyond what has already been said. Using a VPN, you can bypass geo-blocked websites and continue to access their content.

How to See Photos in Facebook Free Mode (Freebasic)

This post will show you a trick on how to view photos while using Facebook free mode otherwise known as freebasic. Ever since freebasic internet browsing was introduced in Nigeria about a year ago, it has saved many people especially those that find it difficult to afford data subscription because with free basic, you can visit some websites without airtime or active data plan on your phone.
Facebook free mode
At the moment, it's only Airtel and 9Mobile networks that supports freebasic internet in Nigeria. I don't know what MTN and Globacom are waiting for. Note that on Facebook free mode, you won't be able to view photos but with this trick, you can now view photos, pictures, images uploaded by people on Facebook. This simple trick is made possible with the help of the Facebook lite app which is the network and data friendly version of facebook app. It loads faster, saves battery, data and of course works in areas with poor network reception 📶 unlike the regular Facebook app.

So without wasting much time, I will like to begin with the requirements you need in order to see/show/view Facebook photos on free mode. Let's go there.

REQUIREMENTS
✔ An Android phone
✔️ 9Mobile or Airtel SIM card without airtime or active data plan
✔️ The Facebook Lite app; you can install it from playstore or simply by clicking here.
✔️ You network should have at least a decent 2G service but 3G or 4G are better.

PROCEDURES
✔ After downloading and installing the FB lite app, open it and log in (if it's your first time using it)
✔️ After about a minute, close the app
✔ Switch off your Data
✔️ Now head over to your phone Settings > locate App > scroll down to Facebook lite > tap it, then clear the data of the Facebook lite.
✔️ Then switch on your data and launch your Facebook Lite app
✔️ Enter your login details again
Facebook lite login
At this moment, you will notice that it won't load when trying to login, all you need to do is just exit the fb lite app and open it again. This time, it should load. You will be welcomed to data mode and also see option for switching back to free mode.
See photos Facebook free mode
At this juncture, you will notice that you are on Data mode and you will start seeing all pictures. This means all images and photos will be visible for you to see now in Facebook free mode (freebasic) but you won't be able to watch videos on the Facebook Lite app.

SEE ALSO: Simple Trick To Unfollow All Your Facebook Groups

That's how to see pictures on Facebook free mode. Why not give it a try if you have no data on your Airtel or 9Mobile SIM? Let's know your observations via the comments box.

How To Get Google Playstore Refund After Mistake App Purchase

This is to balance the previous article on how to get Apple Store Refund After Mistake App Purchase so this is for Android users courtesy of howtogeeks. Google Play allows you to easily refund an app — for any reason — within the first two hours after purchasing it. After that, it gets a bit more difficult and situational — but there are still ways you can potentially get a refund.

There’s no automated way to request refunds for in-app purchases from within Google Play. You’ll have to contact the developer or Google for help refunding or solving problems with in-app purchases.

GET AN EASY REFUND WITHIN THE FIRST TWO HOURS

Google Play’s refund policy is extremely generous within the first two hours after purchasing an app. In the past, this refund period was fifteen minutes — which often wasn’t enough time to download a large game and verify it worked on your phone or tablet. Now, two hours should be much more reasonable.

Within two hours after buying an app, you can get a complete refund for any reason — no questions asked. It’s all automated, but it’s possible Google might step in if they detect an account abusing this.

To do this, open the Google Play app on your Android device, tap the menu button, and tap “My account”.

Scroll down to the “My orders” section. Locate the app you want refunded. If it’s been less than two hours since you purchased the app, you’ll see a “Refund” button. Tap the “Refund” button. Google Play will refund you your money and uninstall the app from Android device. The app purchase on this page will now read “Cancelled”.

Note that you can only do this once for each Android app or game. If you buy the app again in the future, you won’t be able to refund it — that second purchase is permanent. This prevents people from continually refunding and repurchasing apps to avoid paying for them.


CONTACT THE DEVELOPER AND ASK
After the two-hour refund period is up, that’s it. There’s no more easy, automated refund option. Instead, the app’s developer is allowed to decide whether you get a refund or not. To get a refund, you’ll have to appeal to the app’s developer.

Each developer is allowed to come to their own decision, so there’s no single policy that applies here. However, if an app you purchased recently suddenly stops working and becomes unusable, that would be a good reason to request a refund. If your child used your phone or tablet to purchase an app without your knowledge, a developer might also decide to help you. If you just want your money back because you’ve finished a mobile game, the developer probably won’t be very accommodating.

You’ll find an app developer’s contact information listed on an individual app’s page. On your Android smartphone or tablet, open Google Play, search for the app’s name, and look at its page. Tap “Read more”, scroll down, and look for the contact information.

On a computer, you can search the Google Play website for an app and look at the app’s page. Scroll down to the “Additional information” section to see the developer’s contact information.

Contact the developer and ask for a refund, explaining why you think you should get one. The developer has the final say here.


CONTACT GOOGLE FOR HELP
Actually, the developer doesn’t always have the final say. You can also contact Google Play’s customer service people. As Google says:

“If the developer doesn’t have contact information listed, hasn’t responded to your request, or their response was unsatisfactory, contact our support team to see if we can help.”

Google likely won’t refund your purchase unless you have a very good reason. However, if you do, it’s worth a shot.

Visit the Google Play help website, click “Contact Us,” click “Android apps & games,” and click “Request a refund” to get started. You’ll be able to contact support by phone, text chat, or email.

The two-hour window gives you a bit of protection, allowing you to purchase apps you’re not sure about and see if they run well on your phone and are good enough to keep.

After that two-hour window, you probably won’t get a refund — unless you have a good reason and the developer or Google’s customer service people are helpful.
source.


How To Use YouTube Red Free Of Charge Without Subscription

As I stated earlier on my previous post on YouTube Red, in this post, I will show you a tutorial on how to use it free of charge.

YouTube Red is a service YouTube(Google) created that gives users more advanced features and adfree experience while on youtube. Initially, this service wasn't available for Nigerians but later, Google decided to bring it to Nigeria. Meanwhile, there is a major drawback to this service - which is the subscription tag on it. Users are subjected to subscribe for the service monthly in other to use it but the good news is that as long as you are reading this post, you don't necessarily need to pay a dime in other to flex YouTube Red services.

FEATURES OF YOUTUBE RED
✔ AdFree YouTube experience
✔ Videos background Playback
✔ And Save Offline Functions
✔ Ability to get original youtube contents

REQUIREMENTS
1. Xposed Installer installed on your phone
2. YouTube background Playback module
3. YouTube AdAway module.
4. A rooted Android device (See how to root your phone here and here

If u don't have xposed installer on your rooted device please download below because these modules won't work unless your phone is "Xposed".

PROCEDURES
1. Download xposed Installer for Android 4.4 Kitkat here

Or

Download Xposed installer for Android 5.1 lollipop and Android 6.0 Marshmallow here

2. After Installing Xposed on your device, launch the app and go to Framework

3. In "framework", click on install/update and you'll be prompted to Reboot your device.

4. Reboot it and after that, Xposed should be successfully installed.

5. Now to install the modules on your phone, go to MODULES in xposed and Activate them by ticking on them.

6. Restart your phone again and open the newly installed YouTube app, and experience YouTube Red on your Phone.


READ ALSO 📖

Download Cloud VPN For Browsing

Download WizyTechs App For Free Browsing Updates

Download Netflix VPN App

With this simple trick, you should be using and enjoying all the wonderful features in YouTube red free of charge without subscription. Feel free to Share This Post and let others enjoy too.

How To Make Posters and Flyers With Your Android Phone

Android operating system and advancement in technology has revolutionized our activities, making life more easier. I could remember when I use to design posters, flyers, ads banners, calendars etc using a laptop computer but now, I can do all these things with just my Android smartphone as there are many apps available now to make the task simple and faster. In fact, you don't have to be a tech savvy in order to make posters or even logos now. So I will show you how to make posters and flyers with your android phone with the help of an app called "Poster Maker".

So if you want to create promotional posters, advertisement, offer announcements, cover photos for your shop, restaurant, office or social sites? I will introduce one of the best apps for doing it.

Create promotional posters, advertisement, offer announcements, cover photos on the go with amazing backgrounds, texture, effects, fonts, sticker and get the attention you want.

The name of the app is Poster Maker, it is an easy to use app, just select the background you like in the ratio as per your need and add your text with poster design fonts, add wonderful stickers (specially picked for poster making), add your pictures from gallery and create perfect poster every time.

FEATURES OF POSTER MAKER

> Huge collection of backgrounds
> Choose color as background
> Select your own picture from gallery as background
> Add your text with poster design fonts
> Add wonderful stickers (specially picked for poster making)
> Add your pictures from gallery
> Save on SD Card
> Share on social media

WHERE TO GET IT?

The app is available on Google Playstore. You can simply download poster maker app here

I hope you enjoy using it. It's even fun to use.